Wow. Its been 2 months since my last update!. Let me catch you up on what I’ve been up to. Basically, I finally got around to getting the parts I need to get the basics of this arcade machine up and running. Let me take you through them.
Computer
I finally got the computer to use for this! This computer was given to me by my in-laws as they recently upgraded and no longer had a need for their old desktop PC. I also bought a cheap 160 GB Western Digital hard drive for just $20, which I may or may not end up using.
It is a Intel Pentium Dual Core 2.6 GHz with 2 GB of RAM.

Sweet! With this, I reformatted the PC with a copy of Windows XP so that I could start with a clean slate and have no extra programs running in the background to hamper performance. Then after getting all of the arcade software transferred over to it, I could start playing the games using the keyboard or a game controller. But this is an arcade project, so I want to play it with arcade buttons, joysticks, etc. So, let’s move on to those parts!
This cost me nothing, but if I had to buy one, I could have gotten one for less than $50 from craigslist.
Joysticks & Buttons
So where do we even start with trying to find joysticks and buttons for this thing? Well, I did a lot of research on various websites along with forums and Facebook groups dedicated to MAME and custom arcade building. And basically there’s no right answer. It is mostly a matter of personal preference. For joysticks, the first decision is whether you want 4-way or 8-way sticks. The 4-way sticks only move in 4 directions (up, down, left, right). These are for the old games that don’t require a diagonal movement, like Pacman, Frogger, etc. The 8-way sticks will register diagonal movements, which is mostly used in games where you want a character to jump while moving left or right. Since I will have some of those games, I will go with an 8-way stick. Now, some purists claim that the 4-way games like Pacman are simply unplayable with an 8-way stick. I don’t find it to be that big of a deal, so I’m going with it. Also with joysticks, there are two main styles: ball-tops and bat-tops. A ball-top joystick is exactly what it sounds like – there’s a stick with a little round ball on the top of it. This is what you see in most of the old arcade games like Pacman.

Then the bat-tops are sticks with a more elongated handle on top. These are most prevalent in fighting games like Mortal Kombat and Street Fighter.

And, of course, each of these can be bought in a wide variety of colors. I prefer the bat-tops, probably because of all the Mortal Kombat I played while in high school.
For buttons, there are a couple of options to think about. First, convex or concave? Meaning, are the tops of the buttons shaped like slight hills or slight valleys? I chose concave buttons (slight valleys). Obviously, there’s also color options. There are even newer buttons that you can get that have LEDs in them so they can light up as different colors.
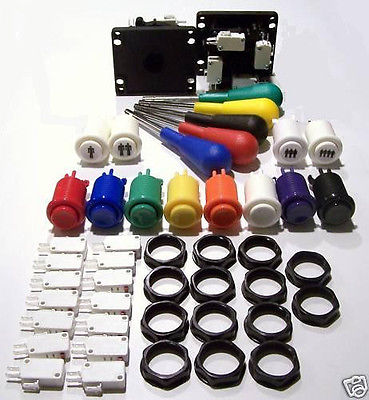
There are a handful of different brands you can find too. I chose to go with Happ as they have a good reputation for quality and are used in a lot of arcades. So I ordered this kit from a site called twistedquarter.com.

This is 2 Happ Competition Joysticks and 14 buttons. I added on a few more buttons that I might need for a total of 18 buttons.
Cost: $42.15 + $14.44 (S&H) = $56.59
Trackball
In order to get my wife’s blessing, her only request was that I include a trackball for playing games like Marble Madness. There are a few other classic games that utilize a trackball, like Golden Tee Golf and Centipede. There are also a handful of games that used something called a spinner that you can sorta simulate with a trackball, like Pong, Tempest, Arkanoid, and Breakout. Typically you can get a trackball in a 3″ or a 2.25″ size, and in a variety of colors. Most common is the 3″ size. So I went with that. Ordered this dude in white from ultimarc.com.

Sweet! We’ve got some controls! But wait, how do we hook this stuff up to our computer?
Cost: $79
Encoder
In order to hook up our joysticks, buttons, and trackball to the computer, we need something called an encoder. The encoder is just a little electrical board that converts signals into keyboard inputs. Wait, what? Remember, currently we can play these games on the computer with a keyboard. For example, using the arrow buttons to move and using buttons like spacebar to fire a weapon, etc. So, if we can trick the computer into thinking that an up arrow button was pressed on the keyboard when we actually just pressed up on the joystick, or that the spacebar was pressed when we actually just clicked one of our arcade buttons, we would be good to go. Well, that’s exactly what an encoder does. After doing a decent amount of research, I found that the IPAC encoders from ultimarc.com were pretty god and highly recommended. So I bought the IPAC2, which supports enough buttons for 2 players, plus a trackball.

This thing came with a USB cord that connects it to the PC. So, now I need wires to connect the buttons and things to this encoder. I could’ve probably gotten some from Lowe’s or Radio Shack, but twistedquarter.com had a handy wiring kit that came with a variety of colors and some connectors, so I went with that. I even picked up 2 of them, just in case I needed more wire.

Cost (encoder): $39 + $16 (S&H) = $55.00
Cost (wiring kit): $27.98 + $12.97 (S&H) = $40.95
Display
There are basically three display options for building an arcade machine. The first is simply to use a PC monitor. This is obviously the easiest option, but (to me) takes away a bit from the nostalgic feel of an arcade machine. So another option is to find an actual arcade monitor. This solution would be ideal and most authentic. However it is difficult to find these and they are not cheap. The third option is to use an old CRT TV. You know, the big bulky square-ish ones that we all had 20 years ago. This is the option I am going with. You can find a plethora of these on Craigslist for under $50. In fact, I got a 27″ Toshiba for $10.

But wait, you can’t just hook up an old TV to a computer directly. You either have to buy a fancy video card that lets you output directly to it or get a VGA to RCA signal converter. So I bought this dude:

The drawback to this is that the resolution on an old TV is TERRIBLE compared to a computer monitor. Normal font sizes of 12pt or 14 pt that are completely clear on a computer monitor are not even legible on a TV. So I’ll have to play around with different fonts and sizes in order to get it looking decent.
Cost: $10 (TV) + $18 (converter) = $28.
Sound
To get sound from our arcade machine, we’ll obviously need speakers. Speakers are typically mounted above the display in an arcade machine. One reasonable option is to simply use old computer speakers – just rip them out of the little speaker cases they are in and go from there. But why destroy a good set of computer speakers when car speakers are pretty cheap? One more common approach for sound in custom built arcade machines is to just get cheap car speakers and a small amp for it. So, that’s what I did. I ordered some 4″ Pyle speakers and a little mini amp and power adapter all from Amazon.


I had an old cable that split a headphone jack into 2 RCA jacks, which I can use to plug the amp into the PC.
Cost: $21 (speakers) + $10 (amp) + $6 (power adapter ) = $37
Power
Alright. Now I’ve got 3 things that need to be turned on in order to play the arcade machine: PC, TV, and Amp. I’ll also eventually have a light behind the marquee that will also need to be turned on. Ugh. I don’t want to have to manually turn all of these things on and off. I want to be able to use one button or switch to turn it all on and off together. Doing some research on this topic, I just discovered these new power strips, sometimes refereed to as “Smart Strips.” These are different from your typical power strips because they have one special slot (the master). When whatever is plugged into the master outlet is turned on, the power strip then provides power to the remaining outlets. And when the thing plugged into master is turned off, the strip will cut power to the remaining outlets. Awesome! So, I can plug the PC into the master outlet, then plug everything else into the remaining outlets. When I turn the PC on, everything else should just turn on automatically! So I ordered one from Amazon.

Cost: $18
But, this still leaves me with 2 issues. First, will the TV turn on automatically? Well, again, after some research , I found that there are a few models of TVs that will turn on automatically when power is pulled and restored – Toshiba and Sony. That’s why I purposefully looked for those brands when finding a TV to use. The next issue is, if I’m using the PC as my master item, how do I turn it on if it is going to be all enclosed inside the arcade cabinet? Well, I’ve seen a few articles and Youtube videos showing how you can take an extra arcade button and wire it directly to the power button of the PC so that pushing the arcade button will turn it on and then holding it in for a few seconds will turn it off. This is the approach I’m going to go with and then mount that button to the back of the cabinet near one side so it is fairly easy to get to.
And that’s pretty much it! That’s enough to get a prototype up and running so that I can verify everything works before I do final cabinet assembly. Total cost so far: $315
Next steps:
- Prototype and test out arcade controls.
- Finalize cabinet build plans.
- Get art printed.
- BUILD IT!